Showing posts with label recipes. Show all posts

Tuesday, January 24, 2012

Tips for Tuesday - Quick and Easy Breakfast


Most of us are looking for a quick and easy way to start the day. Let’s face it if the morning starts off bad, the rest of the day goes with it. Breakfast can be one of those moments where you can save a little bit of time and money. Cereal coupons are not always easy to find or always a good buy. Most of the time cereal is packed full of sugar and carbohydrates and not the most nutritious way to send the kids off to school. They will be on a sugar high and it will be difficult for them to focus during the morning. They will be hyper at first and then hit that crash after about an hour or more.

How can you reduce your morning stress, save money,
and provide good nutritious food for your kids in the morning?

One thing you can do is prepare a nutritious breakfast for the kids ahead of time. On the weekend try cooking a double batch of what you are eating on the weekends. Then you can take the leftovers and have those during the week. This provides the kids with options for breakfast.

Instead of making one pound of breakfast sausage, make two. One for eating on the weekend and put the leftovers in a container to heat up during the week. If you like bacon, make the entire package of bacon. Drain and let cool, then freeze it. Take it out as needed and pop it into the microwave for 30-60 seconds. This is also great for instant bacon bits. Bacon freezes great and comes out crispy in the microwave. This will save time and provide a great protein for the morning. 

There aren’t many people I know who like dirty dishes or like to cook a big breakfast on school mornings. A quick idea for making scrambled eggs is to spray a coffee cup with cooking spray. Then crack the egg and scramble it up in the cup and cook for 1 minute in the microwave. As soon as you get it out. Cut it up some more. This is quick and easy. You could also mix it with some of the sausage, a little cheese, put it in a tortilla and have a quick breakfast taco.

Make a double batch of muffins on the weekends and place the leftovers in the freezer. As soon as they come out of the oven put them on a cooling rack. Once they are cooled place them in a freezer bag and then in the freezer. To thaw and eat, take two out and place in the microwave for 1 min. They usually come out perfect. I use whole grain wheat and a fruit to make this a heartier muffin. I normally make them from scratch for pennies a piece. 

Pancakes are so easy to freeze and to have ready for the kids on school mornings . To add more protein to your pancakes add a half cup or whole cup Greek yogurt to your batter and decrease your liquid. Another bit of nutrition, add some frozen berries or pureed fruit to the mix. If you do both you are providing a protein and a fruit along with the carbs to make the pancake a complete meal. This will keep your kids full longer and avoid the carb crash later. I also use a multigrain pancake mix. Make a double batch. Once the pancakes are done, place them on a cooling rack to cool. Then place them in the freezer. I find they don’t stick together nearly as much after they are frozen. Then you can pop them in the toaster or microwave to thaw. Instead of syrup to top them off with some powdered sugar. It gives them the sweet taste, but they will not eat as much sugar.

If you start doing these things for your morning routine, you will find that you will not only save time, but you may also find you save money too. I have a pantry full of cereal that has not been eaten in while. The kids love the muffins and pancakes and little do they know it is good for them too! Do you any great time saving tips for the morning?

Want to find more great deals? Join Pounds4Pennies BlogFrog community. I will be posting more deals on BlogFrog than on my blog site. If you want to find Blogfrog and check out the latest deals, it is a little further down on the left hand side. Feel free to check back often to find some awesome deals.

Stay connected with Pounds4Pennies on Facebook  for MUCH MORE great savings and deals and steals.

Wednesday, January 11, 2012

Whatever Wednesday - Meatball Soup


I have been sick since Sunday. Thank goodness I picked up the Theraflu from CVS last week. I have been drinking it to relieve my stuffy head. I can’t taste or smell a thing. So last night when I was cooking dinner, I added a few spices here and there, but I didn’t know if it had the right flavor or even if it smelled good. I made meatball soup.  My husband and kids thought it tasted good, but it was fail in my book.

Vote for me @ Top Mommy Blogs - Mom Blog Directory

I will post the recipe how it is supposed to be done and not the way I did it last night. This is a great meal to pull from your stockpile.  I didn’t take a picture because, it looked awful. I put the noodles in the slow cooker and cooked them in there instead of cooking them separately and throwing them in at the last minute. They fell apart and were very mushy. It looked like a meat ball mess, instead of meatball soup. It still tasted ok, from what I am told, but it didn’t look so good. We all ate it and little face even had some today for lunch and he ate it all. So he must have liked it. I ate for lunch too, but I couldn’t taste it today either

Soup:
1 Cup pasta 
1 Small Onion
2 Cloves Garlic
1 28oz Can Whole Tomatoes & Juice
2 Small Carrots
3 Cups Chicken Broth or (1 chicken cube with 3 cups water) 
2 Table spoons Italian herb seasoning

Meatballs:
Or you could use frozen meatballs, print $1/2 Armour Meatballs coupon now!
1 lb Ground Meat
2 Tablespoons Parmesan Cheese
1 Egg
½ Cup Bread Crumbs (I used Italian for more flavor)
½ teaspoon Paprika
Salt and Pepper to taste

Meatballs:
Add bread crumbs, egg, and parmesan cheese, paprika and salt and pepper to taste in a bowl and let set for a couple of minutes. Then add the ground meat. Roll into small ½ inch meatballs. Cook the meatballs in the oven at 350 for 30 min and then throw them in your pot. I like to bake mine before. They come out much firmer.

Pasta:
Cook your pasta in water in a separate pot. VERY Important step!

Soup:
Cook onions and garlic in oil over medium heat until translucent. You can puree the tomatoes and carrots in a blender or pour them in the pot with onions and garlic and use an emulsion blender to puree the mixture. I like doing it all in one pot. Less clean up. Now pour in the chicken broth. Let simmer covered for 10-15 Minutes.  Then add the pasta and the meat and let simmer for a few more minutes.

I hope you will try this soup. It really is delicious, just don’t try to cut the steps like did. I also tried to make this in the slow cooker, instead of on the stove. I wanted something to be ready when we got home. On the stove it turns out great. Tuesdays are our long days and we don’t get home until 5:00. Dinner pretty much needs to be ready when I walk in the door. I got a slow cooker cook book for Christmas, I should have gotten a recipe from there instead.

Stay connected with Pounds4Pennies on Facebook or join me at Pounds4Pennies on BlogFrog community for more great savings.  

Wednesday, December 21, 2011

Whatever Wednesday - Amy's Awesome Sausage Casserole

I wanted to share with you my family’s favorite casserole. This breakfast sausage casserole also happens to be a great meal you can cook from your stockpile. There are not really any special ingredients for this dish. I am one of those cooks who can look in the cupboard or refrigerator and whip something up that tastes pretty good on a whim. I get this from my dad and watching a lot of Rachel Ray. It is about finding flavor profiles of dishes and sticking to that. 


One day I was watching a food network show about casserole winners. I watch a lot of Food Network. I saw a lady prepare a casserole and she said the basics are just a few ingredients Cream of Chicken or Mushroom Soup, pasta, a meat and cheese. I said I can do that. So I ran to my pantry and refrigerator to see what I had along those lines. This is the recipe I came up with. I typically measure with my hands for this recipe, so I had to throw the ingredients into a container to see how much it came out to be. Feel free to make adjustments as you think your family will like it.

Amy’s Awesome Breakfast Sausage Casserole


Ingredients:
1lb Breakfast sausage
1 lg onion (optional) this is my secret veggie I add to the dish
1 package bow tie pasta (you can use any pasta, I used bow tie because it looks fancy)
1 can cream of mushroom
1 can cream of chicken
½ can of milk
8oz cheese
2.8 oz Fried onions or small can of fried onions

Preheat your oven to 350.

First put your pot on to boil for the pasta. Once it is boiling pour in the pasta to cook.

Be sure to get a large frying pan or start this in a big pot. You need to fit all the ingredients listed above in one pot. You can use several, but I don’t like cleaning more than I have to.

If using onion, fry onion in a little butter or oil until translucent. 
Then add breakfast sausage and brown the meat and drain.

Open the Cream of Mushroom and Cream of Chicken soup and put them in the pot. Pour milk into one of the cans about half way and add that to the pot. You can get a measuring cup and add about half a cup. But again I don’t like to dirty something I am going to have to clean. Stir this until it looks smooth and starts to simmer. Add ½ the package of cheese and ½ the container of French fried Onions.

Test the pasta for aldente, it is ok if it is a little under cooked it will cook more in the oven. Drain the pasta and add that to your big pot. Stir all the ingredients together.

Spray a 9X13 in pan with cooking spray. Pour all of the ingredients in your casserole dish. Sprinkle the remaining cheese and fried onions on top. This makes the top crunchy. I think this is why everyone in my family loves this recipe. Place in the oven for 30 minutes. It should be bubbling around the edges when you take it out. As my two year old would say yuuuummmmy!

~   ~   ~

It is a little difficult for me to write this recipe for Breakfast Sausage Casserole, since I just use a couple of handfuls of this and a couple of handful of that. So if you use the exact recipe and want more or less please do so. That is how to become a better cook, by making small adjustments to your tastes.

I would love to know if you try this recipe. I haven’t really shared it with anyone and would love to know if your family enjoys this Breakfast Sausage Casserole recipe. I know my family loves it!

Stay connected with Pounds4Pennies on Facebook or join my Pounds4Pennies on BlogFrog community for more savings.

Tuesday, November 22, 2011

Whatever Wednesday - Cake Mix Whatever Cookies

Cake mix whatever cookies - Pumpkin Spice Cookies


This is a great stockpile recipe. You should have everything on hand you need to make these fabulous cookies. These are my favorite since you can put whatever you have on hand in them and they still turn out fabulous


1 cake mix - you can use whatever you have on hand. I used Spiced cake mix
Oil - I used the puréed pumpkin instead of oil. This makes the cookies softer, less crunchy, let  them bake a couple more minutes if you use fruit or pumpkin


Egg
1 1/2 cup of whatever:
Chocolate chips
Oatmeal
Butterscotch chips
Pecans
Almonds
Raisins


Mix all the ingredients together. It is great if you have someone to help. 


Spoon mixture on to baking sheet. Bake at 350 for 9-11 min. This makes 3-4 dozen cookies. I like to make mine small, so I can eat two and not feel too guilty. These are great in time for thanksgiving and super easy the kids can help.

Tuesday, November 15, 2011

Tips 4 Tuesday


First I would like to make sure you are getting all you can from Pounds4Pennies. I offer additional savings information and HOT coupons on my Facebook page and in my BlogFrog community. Please be sure to LIKE me on Facebook to keep up with the latest coupons and savings deals. I also offer additional tips and coupons on BLOGFROG. If you do like my site be sure to click Top Mommy Blogs and vote for me. One click = one vote. I am 108 and would love to get into the top 100 this week just eight more places to go. I know all my fabulous readers can take a few moments to vote for me. THANKS in advance.

I have a few tips to share with you about not throwing things out. My wonderful husband and I try to avoid throwing anything away. If something is about to spoil or we don't think we will use it in time, we just pop it into the freezer. Why let something go bad and have to throw it away. You might as well take that money and throw it in the trash that you purchased that food with. It is basically the same thing.

Do you ever make a pot of coffee and have some left over? Don’t throw it out. My husband and I love ice coffee. We make a little extra during the summer, so we can have ice coffee in the afternoons. We take the left over coffee and put it a plastic cup or make ice cubes out of it. We use plastic cups, since this is water and it will expand and break a glass container. We then put confectioners sugar and creamer and blend to make a great tasting frappe or just have iced coffee. The confectioners sugar dissolves quickly in ice coffee and you don’t have to worry about the grainy texture from granulated sugar.

What do you do with the left over heels of a piece of bread? Again don’t throw them out. There are several great uses for these. I put some butter on them and toast them in the toaster. Then I place them in my food processor to finely chop them up. I never need to buy bread crumbs. Another thing I do with the bread is make croutons. I butter them and cut them into cubes. Then place them on a cookie sheet and put the oven on broil. Watch very closely as these can burn quickly. I even sprinkle some seasonings on them to make them extra tasty. The kids all time favorite is to save these for duck food. We also keep a bag in the freezer and put left over hot dog buns, hamburger buns or bread crusts in there. When we want to go to the park we automatically have duck food ready for the kids to feed the ducks. This also make a great time for family photos.

My husband and I try not to throw anything out. I hope you will be able to use these tips in the future. Do you have any great tips on how to save or use the extra things you might consider throwing out? I love your comments and I would love to hear from you.

Wednesday, November 2, 2011

Whatever Wednesday - Popcorn Cake

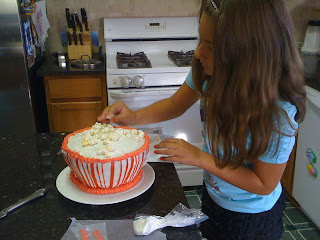
I know some of you have been wanting to know how to make the fabulous Popcorn Cakemade for my daughters 10th birthday movie party. Today I am going to share the simple instructions on how you can make this cake on your own for a Movie Party or Popcorn Birthday Party. You can see the other decorations I used for her Movie Party.


Popcorn Cake
Movie Party Ideas

1. First I started by baking two cakes. One butter and one chocolate. Click to print Betty Crocker cake and icing couponsYou can decide based on what you already have in your pantry. I think butter is the best tasting cake. Let’s face it, it’s cake who is counting calories anyway. I used two 9" cake pans for each cake. To make sure they have the same amount of batter in each pan, use an ice cream scoop and alternate between pans. The cakes will come out even. 

2. After I baked the cakes, I took them out of the oven and let them chill for 10 min. I inverted them on a cooling rack, then set them to cool in the fridge. If I have time I chill them over night. Otherwise it is best to let them sit for at least two hours in the fridge to cool.

3. I cut the tops off the cakes with a serrated knife to even them out. I just eye balled it, but if you have a cake leveler, then use that. Since, I never throw anything out. I kept the leftover cake to bribe little face when he goes on the potty. It worked great. We are almost there!

4. Then I stacked the cake layers alternating butter and chocolate onto a round cake pan. In between each layer I placed a small amount of icing to glue them together. Next is the hardest part of the whole cake. I placed my serrated knife at an angle and cut turning the cake stand to keep the knife at the same angle around the entire cake to make the Popcorn bowl shape for the cake.  Wipe gently to remove any remaining crumbs around the edge and wipe your cake stand free of crumbs. Again you can discard the cake, but that is a crime in my house. I mean it is cake! When you are done this should resemble a Popcorn Bowl.

5. I used nearly an entire can of icing on the outside of the cake with a cake knife. Be a little generous here. You want to capture all the crumbs in this layer of icing. Place in the fridge for about 10 min or more.This is the crumb coat. Don’t worry about all the little chocolate flakes you see in the icing. They will disappear in the next coat. A cake knife is a great purchase if you plan on making cakes. Spreads icing like a dream. 

6. Yes you will need another tub of icing. I used nearly ¾ a tub icing the next layer. This will make all those crumbs disappear. Generously spread icing over the cake again. Now you should have a white cake.


7. This is where the magic happens. Get the strawberry Fruit by the foot. I opened every package until I found the one with the straight lines. Then I measured the cake from the stand to the top. I cut many strips to this length. To create the smaller lines, I cut one strand in half lengthwise.  Start placing them on the Popcorn cake. Two small lines then one thick one, alternating in this pattern around the outside of the cake. Once finished let the kids eat the fruit roll ups this helps keep them quite while you are concentrating on the cake.


8. I took some of the icing and used a red tint to make it red. Be sure you make enough. It is difficult to get the same color. I don’t have a pastry bag, so I placed the icing in a sandwich baggie and cut a small tip and fed the icing through. This is where you can get decorative. I just used small circles at the top of the cake to cover where the fruit rollup stripes end and a straight line at the bottom with the red icing to seal it to the bottom.

9. Now what you have been dying to know is, how did you make that popcorn on top? While you are doing all the above steps, have the birthday person and extra help squeeze two small marshmallows together with their fingers until they stick. Squeeze hard. I used nearly half a bag of marshmallows. This makes awesome looking Popcorn for the top of the cake.

10. Finally I got another Ziploc bag to place all the Popcorn marshmallows in and sprinkled it with yellow decorative sugar. This made it look like buttered popcorn. Shake the bag to get the yellow sugar everywhere the marshmallows stuck together. Keep them in the bag. 


11. Cut from and extra popcorn bag or print the words "POPCORN" in red ink to make the popcorn logo. Glue it to the cake with some icing. 

12. Right before the party started I let my daughter decorate the top of the cake with the Popcorn marshmallows. The more the better. You want to do this last, otherwise you have crunchy marshmallows, instead of soft ones to eat. I normally don’t like candy on cakes, but this was just right and  tasted fabulous for her movie party.


When cutting this Popcorn Cake remember only small pieces are needed, since this is a four layer cake. This picture is one I made for a friend who also had a Movie Party and this Popcorn cake served over twenty guests. 

Please share if you make one. I would love to see your pics.

Wednesday, October 19, 2011

Whatever Wednesday


I have exciting news. I am going to be featured as a guest blogger at Grocery CartChallenge  on Friday. Stop back by to see what I purchased this week and see my article posted there.

 I always like to find something different to fix the family. I usually try to travel around the globe for dinner ideas for the week so no one gets tired of any dish. My daughter is just like me. She asked the other night why we don’t have Mexican food every night. Both of us could eat Mexican food every night. We both love it. Especially if it involves queso of some kind. However, my husband like a variety of food.

This week we traveled to India for a different flavor with ground beef called Keema. I found this recipe on Allrecipes.com App on my phone when I was looking for recipes with cardamom. I purchased this on major sale at Sprouts. See my shopping trip here. I love that I can have my phone in the kitchen with me while I cook and view the recipe without having to print it out and waste toner and paper. Plus I have my recipes with me where ever I go.

According to some of the reviews this is not a traditional way to make this dish and I did a few things different too to make it my own recipe. This made enough to feed all five of us with small leftovers.

Ingredients:

1 lbs. Ground Beef
1 onion Finely chopped
2 cloves minced garlic
½ table spoon Cardamom
¼ table spoon cinnamon
¼ table spoon cloves
A pinch of nutmeg
1 cup or 8 oz of tomato sauce
¾ cup beef broth (I used chicken because that is what I had. Still very tasty)

1. In a large heavy skillet over medium heat, cook onions and garlic until onions are soft and translucent around 5mon.

2. Then add the beef and cook until evenly brown breaking apart with spoon until crumbled. Drain excess fat.

3. Stir in Cardamom, cinnamon, cloves and nutmeg. (I measured it all so it fit in one table spoon)

4. Stir in tomato sauce and broth. Continue to cook on a lower heat until most of the liquid had evaporated reducing the sauce.

This can be served over rice or noodles. Depends what you have the most of in your pantry. This is fabulous burst of flavor from the traditional foods we are used to eating. The husband and the kids loved it. The Cardamom can be expensive. But if you viewed my post, I purchased just a little while it was on sale and that will make four to five dishes. Supper yummy and something different from what you might normally eat.  I just love it. This meal in now in our meal rotation. 

Hopefully I won't have as many problems as I did with my Friday Linky. Do you have any recipes you would like to share? Link up below. Hopefully I won't have as many problems as I did with my Friday Linky.

Wednesday, October 12, 2011

Whatever Wednesday

Zucchini Fritters


I made these when the kids where not home. I really didn’t think they would like them at all. However, when they came back, they scarfed these down. I was so surprised. It may have been how I described them as savory pancakes. They are all over them. Especially the little one, he kept saying “more fritters mommy, more fritters.” I got them to eat vegatables without complaining. This is a big accomplishment in my house. These are on the menu again.

I got the recipe from the App ALL RECIPES.

3 med Zucchinis shredded
1 small onion shredded
3 eggs beaten
½ Romano or Parm Cheese
1 cup Milk
2 Cups flour (I used Whole Wheat Pastry Flour)
Salt, Pepper, Garlic and other seasonings to taste

1. In a large bowl, mix together the zucchini, onion, eggs, cheese, milk and flour. Season with Salt, pepper, garlic and seasonings.

2. Pour a couple of table spoons vegetable oil in a large skillet over medium heat. Drop ¼ cupfuls of the batter in the skillet and flatten slightly. Turn the fritters over when the center appears dry. Cook other side until golden brown

Wednesday, September 21, 2011

Whatever Wednesday - Biscuit Empanadas

Now on to food. It is out of necessity we create or invent. I am not sure if that is a quote, but it is something I am saying now. I have been getting tired of eating the same thing. I really wanted empanadas, but I didn’t have any pie crust. And I was just too lazy to make some. So the mother of invention stepped in and I looked at my fridge. I had taco meat, cheese and biscuits bought on sale and BOOM! Biscuit empanadas were born. We have had this twice. It has gone over well both times. I have been telling my friends and they are willing to try it too.  You can get biscuit coupons here.


Biscuit Empanadas
Ingredients:

1 Can 8 count Biscuits
1 lb. Browned Ground Meat with taco seasoning
1 Cup Cheese
1 Cup Onion (Optional)


1. Open Biscuits and take a rolling pin and flatten out each of the 8 biscuits into about a 6-8 inch circle. Using flour for dusting so they won’t stick.


2. When all are rolled out, take about 1 ½ tablespoons of Browned Taco Meat and place in the center. Then top with Cheese. Fold the dough over and seal with a little water and a fork. 


3. Bake in the oven per instructions for the biscuit empanadas. Super simple and very delicious.


Do you have a recipe you would like to share? Please leave a link below.

Tuesday, June 14, 2011

Tips for Tuesday

With many of us couponing or trying to save money we need to stretch those box meals a little further. For me a simple box meal just doesn’t feed all five of us.  I like to have leftovers for little face and me for lunch the next day. It is easier to decide what we will eat and I don’t have to make a big meal just for two people.

I would like to share with you a few ideas I have for adding flavor to boxed meals without adding sodium. The sodium content of these is amazingly high. I try not to feed these to my family very often, but they are better than buying fast food for five of us. I will do it in a pinch.


The best thing to add to any meal is an onion. I can purchase these for $0.49 lbs. So I am only adding $0.49 extra cost to my meal. I usually use ½ or 1 onion chopped and sautéed . This adds not only lots of flavor but around a ½ to 1 pound of food to the meal. The kids don’t even know it is in there, since most boxed meals have onion powder. Adding onion ramps up the flavor and increases the vegetables for the meal.


I also like to add carrots, especially to higher sodium meals. This will help decrease the salty taste in a meal. I will add around 1 or 2 peeled and either shredded, pureed or chopped finely. This is around ¼ to a ½ cup of carrots. What a sneaky way to enter extra veggies into the kids meals and they don’t even know. I like to add carrots to Sloppy Joes too. We just need a little more to make it stretch to feed all of us.


Corn is the next best thing to add to a meal. I find it goes well especially with Mexican dishes. I try to buy frozen when I can. Otherwise just open a can and pour it in. I like the cream style corn with the Asian Rice a Roni. Use the water from the can for the water to add to the dish. This will add just a little more flavor than just regular water. I will also save the water from the corn and use this for soups later.


Try adding peas to a meal. If you or your kids don’t like the taste of peas try pureeing them and add that to the meal. You won’t see them or taste them either. I like to add peas to fried rice and canned soups.

Beans can be added for extra protein to any dish. I like black beans for Mexican dishes. Sometimes I will add both corn and black beans to stretch a meal.

Try adding a little of two or three of the above mentioned vegetables to each meal to see what you can come up with and not change the taste too much. This is a fun experiment to try with your family. Try other vegetables you like to see what other combinations you can come up with. Look at the box and see what dehydrated veggies are already in there and add the real thing. This is a great way to stretch a meal for just a few pennies per meal.

Do you normally add anything to a box meal? What are your favorite recipes to add veggies to? What Veggies do you add?

*Photos provided courtesy of Wikipedia

Friday, May 13, 2011

Recipe - Healthy Breakfast Smoothies for Kids

Ice Cream for Breakfast - Healthy Breakfast Smoothies for Kids

Here is a quick and easy breakfast your kids will love. They will think you have gone crazy giving them Ice Cream for breakfast. Little do they know this is a healthy breakfast smoothie for kids, but oh so yummy. I tell them this is ice cream, so they think they are getting a special treat.

First start with yogurt. I like to use greek yogurt, since this has a higher calcium content than regular yogurt. This works great with regular yogurt too. You can use plain or vanilla yogurt. Then the night before freeze the fruit you plan on using. I like to use frozen strawberry puree.

Then I add oatmeal, wheat germ and /or flax seed. If using all three use about 2 table spoons each. If using just one then use about ¼ cup. This may not be to everyone’s taste experiment to see if you like this. My daughter thinks it is cool to add the oatmeal; however my son thinks it is nasty. Then blend with an emulsion blender. If you do not have an emulsion blender then you may need to add some milk to a regular blender and blend. The frozen fruit freezes the yogurt and it tastes like soft serve ice cream. Very delicious. I also make these healthy breakfast smoothies for kids as a treat in the summer time. They think they are getting ice cream, but I know they are getting the nutrition they need.

If you are using berries and plain yogurt you may need to add a teaspoon or two of powdered sugar to cut the tartness of the berries. But it is far less than a scoop of real ice cream. I like to use powered sugar since it is already so fine you don’t have to worry about the little crunchy granules you may get with regular sugar.

I buy all my strawberries in the summer when they are the cheapest. I then take them and put them in my blender and puree them. I place them in freezer bags ½ cup at a time and freeze them flat. I have great strawberry puree all year round for pancakes and waffles. I even use them in my brownie mix instead of milk or water. Very yummy.

Do you have a yummy delicious recipe? Tell me about it or tell us where we can find it on your blog.  Link up here too!

I went to Sprouts and purchased a few items:

0.90 lbs of raisins @ $1.49 lbs - $1.34
2  Voskos Greek Yogurt $2.00 each

Bag credit of $0.05

Total spent $5.29

My totals for the week I spent $55.19 total saved $75.63 for almost 58% savings. I was so close to my $50.00 budget this week. If I would not have gone to Sprouts I would have been within budget. I just couldn’t pass up Greek Yogurt for $2.00 for 16 oz. I just wish I had a coupon to get it cheaper, but I didn’t find any. I looked too!

Link up your weekly deals here. I am still going for 10 links this week. I love to visit blogs that link up to check out your deals for the week. Once I get 25 followers I will open a Facebook page and you can follow me there.

LINK UP!

Saturday, May 7, 2011

Recipes

Items that freeze well
I am making a list of items that freeze well and I will add to this list when someone gives me a new idea or I find something else I can freeze.

Here is a list of items that I have found that freeze well and the best way to thaw them.

1. BREAD. Freeze in the normal bread plastic this will last around a month in the freezer. To thaw simply lay on the counter.

2. Hot Dog and Hamburger buns. Pretty much same as the bread. Freeze in the normal bread plastic this will last around a month in the freezer. To thaw simply lay on the counter.

3. TORTILLAS. Freeze in the plastic it comes in. Thaw a day before you plan on using them. I recently tried this and they were great.

4. WAFFLES and/or PANCAKES. I usually make a double or triple batch. Let them cool on a wire rack individually separated. Once cool freeze. Place in large plastic freezer sealing bags. Pancakes and Waffles are best reheated in the toaster and use the frozen setting if you have a toaster with this option. However, my waffle maker makes the Belgian waffles and they are too big for the toaster. I heat them in the microwave on one side for 1 minute, flip then the other side for 30sec. It depends on your microwave as to how long you need to do this for the center not to still be frozen.

5. Fruit in season. Especially berries and bananas. I have even washed strawberries, blueberries and raspberries and freeze them in the container. For some reason they do not get freezer burn. I also will puree the berries and freeze them as 1/4 cup in baggies and freeze them flat. Then you have berry puree for pancakes, waffles, homemade ice cream and brownies whenever you want. I just cut up the banana into small bite size pieces so it will blend well. This will keep a long time.

6. Broccoli and Cauliflower. I just lightly steam them for a couple of minutes, cut the heads up into bite size pieces. Freeze in a larger Ziploc bag. Enough for a meal for your family. Take out when ready. Sometimes broccoli and cauliflower are even cheaper fresh rather than buying the already frozen and more nutritious. I also make purees out of them. Put them in ¼ cup baggies and add them to meals to sneak in extra veggies on my kids who don’t like them.

7. Squash. I love Acorn and Butternut squash. You can usually get this in season for under a $1.00 a pound. I bake it in the oven for around an hour at 400. Then the inside is soft to scoop out. I will make either a butternut squash soup or just freeze in ¼ cup baggies and use in meals.

8. Rice. I love to make a large batch of Rice. It takes as long to make 1 cup as it does 3. Let the rice cool. I then portion it out to a normal meal and then freeze in a baggie. Lay on the counter to thaw. You can heat in the baggie, but I perfer to take it out and heat in a bowl. I just don't think the plastic is safe for my family.
 Do you have anything you freeze that is not listed? Share your ideas. I would love to hear from you .

Thursday, March 31, 2011

Recipe - Tequila Chicken

Last night I was trying to figure out what we were going to have for dinner. I wanted something Mexican, but I didn’t want tortillas. Since I didn’t have any. I was planning on going to the store Thursday, today. So I remembered I made Tequila Chicken. This is also a very healthy meal. If you don’t drink or opposed to alcohol you do not need the tequila for this dish. We didn’t have any last night and it was delicious.

Tequila Chicken
I forgot to take pictures so here is the recipe:

1lb Chicken (I use the breast)
1 tblsp cooking oil
1 12oz of chunky salsa
3 tblsp fresh cilantro
1 tblsp tequila
1 tablespoon lime juice
2 teaspoon lime zest (zest of one lime)
1 teaspoon sugar
¼ teaspoon cinnamon
¼ teaspoon red pepper
¼ teaspoon garlic powder
2 cups cooked rice

Cut chicken into ½ inch strips.

In a skillet brown chicken in oil until a light brown, drain cooking liquid from skillet.

In a bowl combine the salsa, cilantro, tequila, lime juice, lime peel, sugar, cinnamon, red pepper, and garlic powder. Pour over chicken in skillet. Bring back to boiling. Reduce heat and simmer uncovered for 10 min until chicken is thoroughly cooked. Serve over hot cooked rice.

This is the actual recipe, but if you don’t have some of the ingredients that’s ok too. I didn’t have cilantro last night and I wasn’t going to run to the store just for cilantro, but it still tasted great. If you don’t have a lime you can always substitute a lemon. I never actually measure spices I just eyeball them. A dash here a palm full there. It tastes great. I usually use fresh garlic too when I can. For this recipe I used one clove and cooked it with the chicken. I also added one medium onion for extra flavor and an extra veggie when I cooked the chicken.

I had a nine year old girl, 19 month old son and a husband at home last night and they all loved Tequila Chicken. It has a classic salsa taste, but the cinnamon really makes it. I just love the flavor of this dish. Try it out sometime and let me know how it turns out or if you do anything different to the recipe and it tastes great.

I would love to hear from you.
Related Posts Plugin for WordPress, Blogger... Affiliate links may be used in the above post. I may be compensated for clicking links listed above.